There are many different methods of making fabric flowers and I’m going to show you one of them. They come together very easily and you can use them for all kind of accessories and embellishments. After the basic fabric flower tutorial, I will show you how easy it is to add one to a headband! Or glue one to a hair clip if you prefer. You can also glue a pin back to one and have a pretty accessory to pin to a jacket or purse. They can be sewn onto t-shirts or tank tops to dress them up a bit.
You can use all kinds of fabric, but the best ones are the kind that don’t fray. T-shirts work great for this so don’t throw those old ones away – make flowers out of them!
This is all you need: small amount of fabric or t-shirt, small piece of felt that closely matches your fabric, glue gun and a flower template. You can cut one out yourself…just make sure it has 5 or 6 petals.
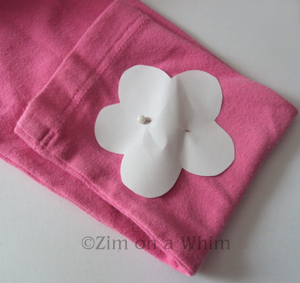
My flower template was made by tracing the rim of a juice glass and then I just drew some petals and cut it out. My template measures about 2 1/2 inches across, but you can make yours any size. I needed a black flower for a necklace that I was making (post coming!), but from here on I will show you with the pink fabric.
Pin your paper template to your fabric and cut out your flowers. Start by cutting out either 13 flowers (for a looser flower) or 17 flowers (for a tighter flower). This might depend on your fabric or what kind of look you are going for. I’d recommend cutting out all 17 and then deciding as you go. I used the arms of a long-sleeved t-shirt for my pink flower and I folded it so that I could cut 4 at a time.
Cut out a circle of felt that is smaller than your paper flower template.
Now grab that handy glue gun! Take a flower and fold it in half. Then fold it in half again (so it looks like a slice of pizza – can you tell I’m hungry?).
Glue that first flower down onto the felt circle, positioning the folded point of the pizza slice flower petal at the center of the circle. Fold 3 more like that and glue each one down as well.
Now you are going to fold 4 more in the same way and glue them each down over this first layer. But you need to position them differently – over the pizza cuts edges of the previous petals.
When you have this second layer finished, you can see if you want to make another layer or not. I thought with my knit fabric that it needed another layer. We will be adding something to the center so save a little room for that! Whether this is your final row or if you go on and make a third layer, you may want to use your glue gun and glue down the folds of those on top. You will see what I mean. They are floppy and start coming apart.
After you have made your layers, take another cut out flower, fold it in half, and start rolling it into a cone shape, slightly off center.
This is too tall to use as is, so snip off a bit from the bottom. (Check the height with the inside of your flower and snip off more if you need to.) Hot glue this rosette into the middle of your flower. Press down until it’s dry. Fluff up your flower and then glue the top layer of petals to the rosette to fill out your flower. If you see any uneven cuts, just take care of them now.
You are done! I used 13 flower cuts for the black one and 17 flower cuts for the pink one.
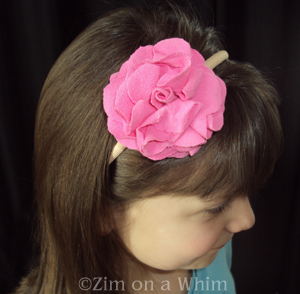
If you want to see how to make a headband with one of these cuties, follow along!
Here’s all you need: Completed flower (or a few small ones), felt circle that matches your flower (again, pretend that one is pink – although here it works since it matches the headband), and a glue gun. I bought a 5 pack of fabric covered headbands made by Goody for $4 and they are perfect for these!
Glue the bottom of the flower to the headband, somewhere on the side. You may want to put on your headband and mark where you’d like the flower to go. Take the felt circle and glue that to the underside of the headband, and to the bottom of the flower where the felt is. Make sure it’s secure.
It takes a minute or two to dry and then it’s ready to wear!
I made a black one, too…for me. 🙂
I hope everything was clear. Please ask if you don’t understand something. Easter is right around the corner and Mother’s Day is coming up. I’m sure you can find something that needs one of these flowers! Now, I’m off to see if there’s any pizza around…
~Micha


I love this. So simple and beautiful. I will be making this in the near future!
Thanks and yes it is very easy peasy. It’s sort of part one of two because I’m going to be posting a necklace tutorial using one of these. Have a great day!
I’m looking forward to that one! You too!
What a great tutorial and a cute little project! I’d love to make some for Quinn, but for now, she tolerates nothing on her head. Hopefully soon though as I’d love to get her sporting one of these cute flowers 🙂
Isn’t that frustrating? Don’t they realize how cute they look? I had the same thing with my daughter. Maybe you could sew one on her shirt…although she might yank at it all day!
Haha, she has a flower on one of her shirts now and she tries her best to rip it off! Quinn is also rather fair-haired and doesn’t even have that much hair going on, so a headband would help her out. Alas… 😉
Love this idea and I can’t wait to see them in a necklace. I like the idea of finding fun, cute things to do with all those old t-shirts that are too worn out/stained to give away.
I’ve seen some really unbelievable t-shirt transformations and upcycles…some people are so creative with their sewing machines!
LOVE the flower…and the adorable headband!!
Thank you!
So pretty . . . I must try this! 🙂
I hope you do…there’s so many uses for them!
Pingback: Pot Rack to Pretty « painted posies
Hello! Im doing the flower. The recipe seem simple and the result so nice !!! but my glue doesn’t work so i’m sewing the petals.
thank you for share your flower recipe!
Hi there! I’m glad it worked out for you! If you use high temp glue (not low temp) in your glue gun it should work, but you found a way so that’s good! Thanks for visiting!
Hello again!
i’m writing a post showing the flower i made with your help.
I’m posting it, but i’m putting your post and the name of your website.
It’s ok for you? if you are not, i can’t put it off … 🙂
(sorry for my english, is certainly not very good …)
Your flower came out pretty! Thank you for linking back to me…Have a good day!
thank you!! you too !! 🙂
Pingback: Ma Fleur en tissu | MosaiqueDeVero ♥
lovely fower. like to try
Pingback: 10 Fabric Flowers |
Good morning, thanks for sharing a great idea! Was sitting up in bed with a really snuffly cold feeling miserable – now can’t wait to try these pretty flowers……..just wish I was still young enough to wear them – don’t worry, I will find a way! Many thanks for brightening my day 😊 Lyn Woodrow
Hope you are feeling better, Lynette!
I needed a fabric flower and came across your blog – thank you so much for the tutorial.
Great! Thanks for stopping by!
I just made two of them and not only were they easy but they came out beautiful, thanks so much. I even alternated using hot pink raw silk my aunt gave me and a red silk lining fabric for the different layers with the two different flowers having the different colour petal for a centre. I am going to go crazy and wow people, I owe you big time.
That’s sounds fabulous, Teresa! I’m sl glad you found the tutorial easy to follow….thanks for stopping back to let me know!